Category Archives: Food

The Land of the Midnight Sun

So…it’s been a while. I blame it on the summer holiday, or lack thereof. I’ve spent three months back home in Norway now and I’ve been working most of the time. I have cooked and baked, I just haven’t had the time to blog about it. I have just returned to New York and I have about a week off before school starts so I thought I would take the time to blog about at least one of the things I’ve made this summer. I went away twice this summer, a week in London and a week in the North of Norway. In the North I visited my grandparents who live in a small town right by the mountains and the fjord. It’s a really beautiful part of Norway, very different from Oslo. I was there in the middle of the summer when there is 24 hr sunlight. It feels very strange because the sun really never sets, it’s always light out which makes it really hard to go to sleep at a reasonable hour.

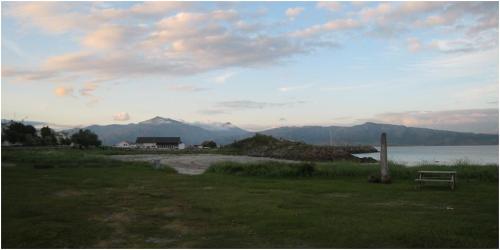
I took this picture around midnight, from my grandparents’ garden.

But I really loved going there this summer, just to experience the nature, the sea, and of course to spend some time with my family. I always eat well when I’m up there. My grandmother bakes really good bread and she always has a couple of nice cakes ready to go. While I was there, the rhubarb in the garden was growing by the day, so I made rhubarb pies a couple of times. They were very good, but we Norwegians live for strawberry season so I knew I had to make something with strawberries. Then, I spotted this recipe in a magazine and I knew that this was the cake I wanted to make. It was really delicious, fairly simple to make, and very different from anything I’ve made before. I followed the recipe to a tee, but if I were to make this cake again I would make a few changes. Instead of using half of the oat crackers on top of the cake, I would mix in a couple more tablespoons of melted butter and made a firm crust under the cake instead. Also, I’m not a big fan of cognac, so I would just leave that out.

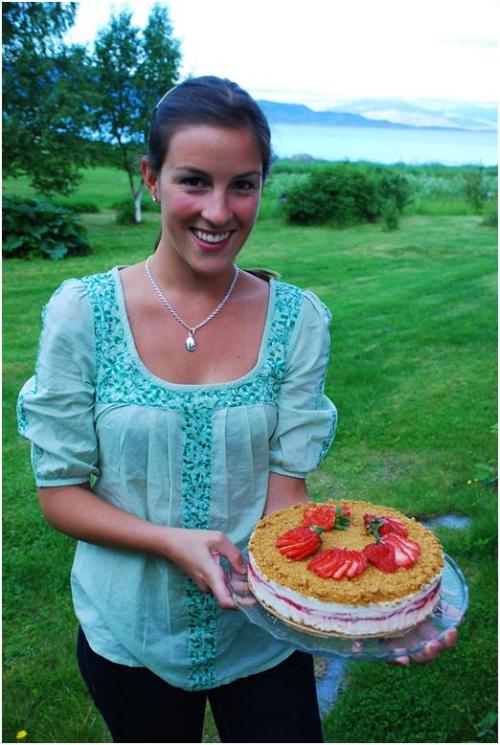
Here’s me with the cake, mountains and fjord in the background.

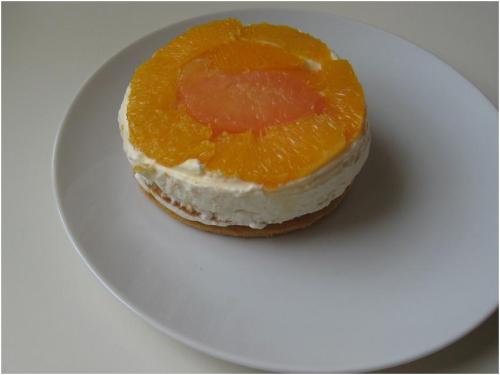
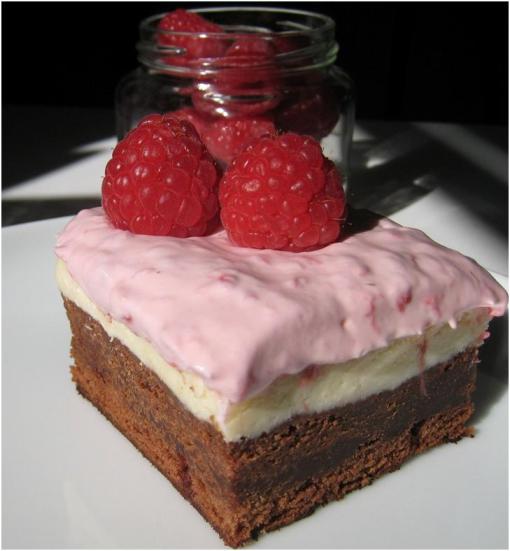
The top of my cake, my dad showed me how to slice the strawberries so they would look nice. (The one on the bottom, the one that doesn’t look so nice, that’s the one I sliced)

Frozen strawberry cheesecake

(yields about 12 slices)

300 g oat crackers (or Graham crackers)

3 tbsp butter, melted

3 eggs

250 g cream cheese

1.5 tsp vanilla extract (or 1 tbsp vanilla sugar)

1 dl powdered sugar

1 orange

3 dl whipping cream

500 g fresh strawberries

4 tbsp cognac (optional)

Directions:

  1. Lightly butter a 24 cm spring form pan.
  2. Crush the crackers and add the melted butter. Add half of the crackers to the cake pan and press down with your hands so that all the crumbs are packed firmly (or add all the crumbs now, instead of using half on the top of the cake).
  3. Separate the egg whites from the yolks. Mix the yolks with the cream cheese, vanilla and powdered sugar until the texture is creamy. Zest the orange and add the zest to the mixture.
  4. Whip the egg whites until they form soft peaks. In a separate bowl, whip the cream.
  5. Mix the cheese mixture with the egg whites and the whipped cream.
  6. Mash the strawberries with some powdered sugar and the cognac, if using.
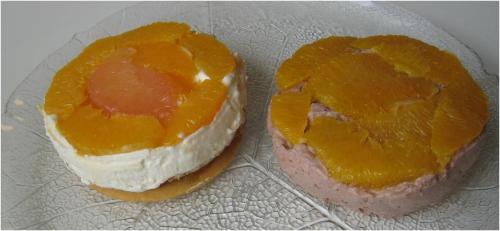
  7. Pour half of the cheese/cream mixture on top of your cake base, and spread all of the strawberries on top. Follow with the rest of the cheese mixture, then the rest of your oat cracker crumbs (unless you used it all for the base of the cake).
  8. Cover your cake and place in the freezer for at least four hours. Take it out of the freezer and place on a serving dish 30 minutes before serving. Decorate with fresh strawberries.
  9. Enjoy!

Source: melk.no

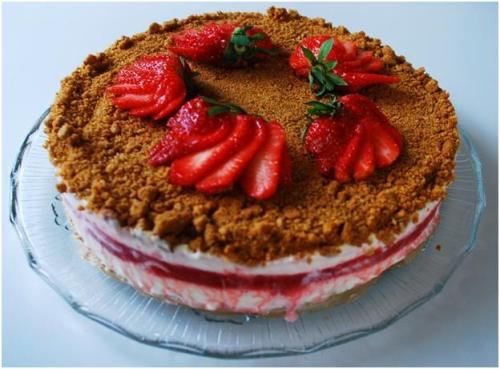
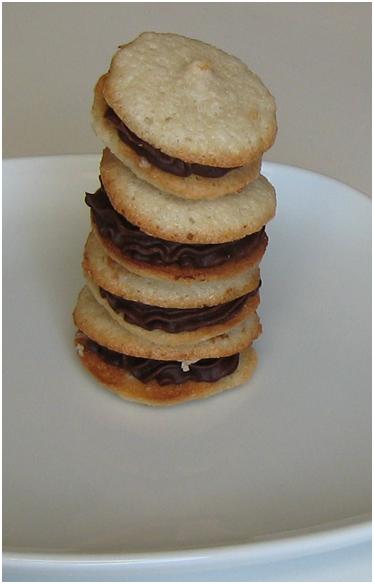
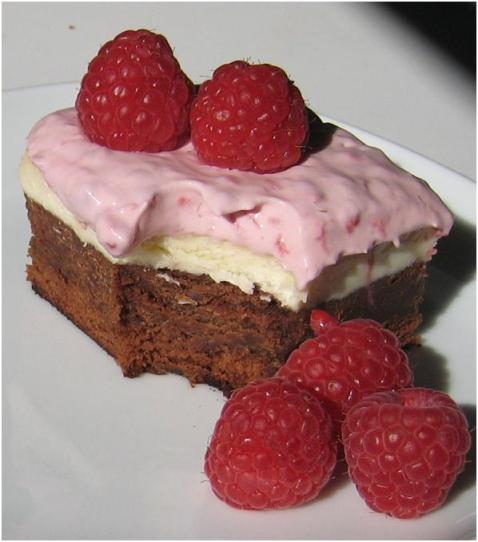
Looks pretty good, non?

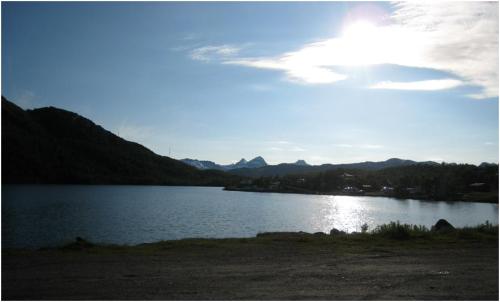
Another picture from my adventure in the North.

Thanks for stopping by!

Piece Montée

The May 2010 Daring Bakers’ challenge was hosted by Cat of Little Miss Cupcake. Cat challenged everyone to make a piece montée, or croquembouche, based on recipes from Peter Kump’s Baking School in Manhattan and Nick Malgieri.

I was so excited when I found out what this month’s Dearing Bakers challenge was. Finally something that was very unique and used techniques I was not familiar with. I started out the night before by making the pastry cream. This is probably my third time making pastry cream and I’m definitely getting better. Maybe it was just the recipe, but this was the best pastry cream yet. Making pate a choux (for the puffs) was definitely something very new to me. The dough is made over heat, which made it very difficult to keep the eggs from scrambling when you added them. I think I managed pretty well, but my arm got very tired from all the heavy stirring. After the puffs were baked and chilled they were all ready to be filled with the amazing pastry cream. I used a very small tip and a pastry bag and just filled the puffs. Piece of cake! Putting together the Piece Montée was more difficult and required caramel to make them stick together. I have worked with melted sugar before, but I still managed to get burned (it still hurts!). I ended up with a Piece that was a little crooked and not too pretty, but tasted amazing (I guess you could call it an ugly duckling). I decorated with a sprinkling of powdered sugar and some strings of caramel. Thanks to my boyfriend for helping out!

Ready to be filled!

Filling them up!

Filled and ready!

Finishing touches!

Too Late for Easter

This post is a little late, but I haven’t had time to post until tonight. I made these cute little sugar cookies the other day, just in time for Easter. I don’t really celebrate Easter at all, but ever since Halloween I’ve been looking for an excuse to decorate sugar cookies again. After I had made the dough, rolled it out, and placed it in the fridge to chill, I went out for a run. My plan was to pick up some egg-shaped cookie cutters on my way back, but the store was all sold out. I decided to cut the egg shapes myself, which took so much time I ended up staying up till way after midnight decorating the cookies. But it was worth it in the end, just look how pretty they turned out!

I followed the same recipes that I used for my Halloween cookies, but I forgot to chill the cookies for 15 min after I had cut them. As far as I can tell, the only difference was that the cookies weren’t as flat as they should have been. I thought my cookies looked pretty good… until I headed over to Annie’s Eats, she is so talented and everything she makes always turns out so pretty.

It’s time to go back to studying now. Lately it feels like I have so much work at school that it’s never going to end. The weather has been gorgeous in New York these past few days, which makes it even sadder that I have to stay inside studying all day. But, it’s not all work and no play. My dad and my sister came over to visit and we’ve had so much fun. We have had so much amazing food, and we rented bikes one day which was such a fun and different way to see Manhattan.

Thanks for stopping by, and have a great week!

Orange Tian

The 2010 March Daring Baker’s challenge was hosted by Jennifer of Chocolate Shavings. She chose Orange Tian as the challenge for this month, a dessert based on a recipe from Alain Ducasse’s Cooking School in Paris.

I’m not sure how I feel about this challenge. It was exciting to make because I have never had a tian before, yet there was nothing new about the techniques used for making this dessert. The flavour of the finished tian was great, but I think I would have preferred a fruit salad with whipped cream. The tian consisted of four layers and a caramel sauce to go over the top. The bottom layer was a Pate Sablee, followed by a layer of orange marmalade, then whipped cream, and finally orange segments on the top. The most fun part about this challenge was segmenting the oranges and making the marmalade. A few years ago I watched a TV show where a chef was demonstrating how to segment oranges, I never thought that was something I needed to know, but I think this just proves that TV can be educational and I shouldn’t feel bad when I’m watching Grey’s Anatomy instead of studying… 😉 Hands down the most tasty /best part of this challenge: the raw pate sablee dough before it was baked. So, so yummy.

The thing I didn’t like about this challenge was that if felt so much like the previous challenge, Tiramisu; Only a little bit of baking, a lot of cream, and then just assembling layers. When I joined the Daring Bakers I thought there would be more baking involved (obviously), something with baking powder or yeast, but lately it just feels like we’re making desserts without doing much baking. Also, even though the pate sable dough tasted great, it was a pain to roll out. I don’t know what went wrong because I followed the directions exactly… but a big “thank you” to my mom for doing the work after I decided to give up and was contemplating whether or not I should just eat the whole dough raw.

In the end though, I was happy with the result. I decided to flavour some of the whipped cream with cocoa powder and I substituted grapefruits for some of the oranges. Now I’m just crossing my fingers that the next challenge will be something that is more baking-related.

Thanks for stopping by folks!

Tiramisu

The February 2010 Daring Bakers’ Challenge was hosted by Aparna of My Diverse Kitchen and Deeba of Passionate About Baking. They chose Tiramisu as the challenge for the month. Their challenge recipe is based on recipes from The Washington Post, Cordon Bleu at Home, and Baking Obsession.

It’s been a long time since I have blogged, two months to be exact. I have a good reason though, my laptop died so while it’s being fixed I’m using another laptop. This laptop is not compatible with the memory card in my camera and my camera cord is all the way across the Atlantic. So…I have been making food, just not blogging about it. I thought I would share a couple of links to some of the recipes I’ve tried recently:

Cinnamon Pull-Apart Muffins

I made these absolutely amazing muffins from Joy the Baker. They were so delicious and fun to make. I’m not a big fan of raisins in baked goods, so I used chopped pecans instead. I definitely recommend these muffins for anyone who loves the cinnamon-sugar combo.

Spinach & Artichoke cups

A little snack that I made for Super Bowl. This was my first ever Super Bowl and I had a lot of fun watching it even though I don’t know the rules of American football. A couple of days before the Super Bowl I had been out to dinner with a friend who was visiting from Norway, and we had the hot spinach and artichoke dip as an appetizer. These cups were just like that, only bite-size 🙂

Butternut Squash Ravioli

I have never made ravioli before, but when I saw a post by Iowa girl about homemade ravioli I was very intrigued. She used wonton-wrappers instead of making pasta, which makes the whole process less time-consuming. I was really happy with the result (I’ve made the recipe twice already), and I recommend these for anyone wanting a delicious dinner.

These were just a few of the recipes I’ve tried these last couple of months. I really like reading blogs and getting ideas about recipes to try, but I do feel a bit sad that I don’t use my cook books as much as I would like.

Well, back to the Daring Bakers. I skipped last month’s challenge because I was very busy around that time. I was equally busy with school work this week, so I ended up staying in the kitchen until midnight making all the different components to this tiramisu. Yes…we made EVERYTHING from scratch, including mascarpone and lady fingers. Making mascarpone was not fun, making lady fingers was a lot of fun. The pastry cream we made was really good, lump-free and easy to make (if I’m ever making pastry cream again, this is the recipe I will use). The finished tiramisu was really good and I’m happy that I challenged myself to make it, but I don’t think it would have been much different had I used ready-made mascarpone and lady fingers. The portion was quite big, enough tiramisu to serve at a party. Luckily for me and my waist line, Brittany’s family was in town for the weekend and came over for some yummy desert. I still have some in the freezer that I’m planning on serving to my mom when she comes to visit this weekend. The last piece of tiramisu is now in the fridge, waiting for my mom to come over after dinner 🙂

Enough for now, I’ll get back to posting more frequently soon. Thanks for stopping by!

Pepperkakehus

The December 2009 Daring Bakers’ challenge was brought to you by Anna of Very Small Anna and Y of Lemonpi. They chose to challenge Daring Bakers’ everywhere to bake and assemble a gingerbread house from scratch. They chose recipes from Good Housekeeping and from The Great Scandinavian Baking Book as the challenge recipes.

I know this post is a day late, the reveal date is the 27th December, but I have been very busy so far this holiday season.

The house is a little crooked and I didn’t get any good pictures, but I still think the house is pretty cute.

After skipping out on last month’s Daring Bakers’ Challenge it was time for me to get back into the game. Since I am from Norway I thought I should use the Scandinavian recipe. After reading through it I realized that it was not the same recipe we normally use in Norway. I added half a teaspoon of pepper, making my house a Norwegian pepper cake house (Pepperkakehus) instead of a gingerbread house. I had a lot of fun doing this challenge and I’m happy with the way my house turned out even though it looks like it was made by kids. I had good decorating help from Brittany and we had a great night with some friends decorating gingerbread men.

I think this will be it for now, I’m in Norway enjoying the holidays and the snow. Happy holidays to all my readers!

Lentils Two Ways

Here’s one for my vegetarian friends (or only one friend that I know of)! This will be a short post as I am very busy with school work at the moment. This week I started working with Cupcake Kids! teaching kids from five years and up about nutrition and cooking. We make whole wheat pizzas and talk about the food pyramid and where our ingredients come from. I am really enjoying it and I think it is a great experience for me. Whenever I have some spare time I try to go for a walk and take in the beautiful fall colours. New York is still nice and warm; hopefully it will stay that way until Christmas. This weekend I went to Billy’s Bakery and Magnolia Bakery for the first time, with my friends Anisha and Martin from London. Both bakeries are very popular and have a very similar selection of cupcakes and cakes. Since Magnolia was featured in an episode of Sex and the City it is obviously the most well-known of the two, but is it the best? I decided to take on that challenge and find out. It’s hard work, but someone’s got to do it, right? Instead of trying the cupcakes I had banana cream pie, something I’ve never had before. Which pie was the best? They were both very good and very rich, but I have to say that Billy’s was the overall winner, even though Magnolia’s pie had the best crust. I hope this information has helped you so that you can make the best choice whenever you are in NY, craving some pie. Hopefully I’ll get to try more from their selection, but I really don’t think I should do this little test too often!

On to the recipes. Lentils are a great substitute for meat as they are high in protein and fibre and low in fat. They are usually cheap and can be found in many different colours. If you buy canned lentils they are ready to be used, but dried lentils need to be soaked in water overnight. I used canned lentils for the soup and dry lentils for the dahl. The dahl recipe is from my dad, I’m not sure where he got it from. This will be a first for this blog (and probably last): the soup recipe comes from my sister! As some of you may know she rarely cooks, but this was her go-to recipe during the last two years in London if I was ever fed up with doing the cooking all the time. According to my sister this recipe serves one, but I had enough for lunch two days in a row so I would say it serves two for lunch.

Nora’s Lentil Soup

(serves 1-2)

1 tbsp olive oil

1 small chilli, chopped

1 clove garlic, chopped

1 stock cube, broken up into little pieces

Fry these ingredients together in a saucepan over medium heat.

1-2 stalks celery

1 can lentils (with the liquid)

½ can water

Directions:

Add the celery, lentils and water to the saucepan. Bring to the boil and let simmer for a couple of minutes. Mix in a blender until the soup has a creamy consistency with smaller bits of lentils (just a few seconds). Be careful not to put too much soup in the blender at a time, about a cup worked fine for me. “And tadaaa, the world’s most complicated dish!” as my sister wrote when she sent me the recipe. I had my soup with whole wheat toast, a dollop of non-fat yogurt, some dried roasted onions, and some coriander.

Dad’s Dahl

(serves 4 as a side dish)

300 g lentils (soaked)

300 g finely chopped vegetables, preferably carrots and onions

1 large garlic, minced or finely chopped

1 tbsp butter/oil

6 tsps curry powder

A pinch of chilli powder if you like it hot.

Directions:

  1. Heat the butter or oil (I like to use a mix of the two) in a large saucepan.
  2. Add the curry and fry until it foams and then add the garlic. Be careful that the garlic does not burn.
  3. Add a dash of water and let it boil for a minute or so.
  4. Throw in the rest of the ingredients and let simmer on a low heat for at least 20 minutes. I like to let it simmer for about one hour but then I usually have to add some more water along the way.
  5. Add salt to taste. If it is too hot, add some cream or yogurt.

I served my dahl alongside fish that I cooked in curry paste and yogurt, some tsatziki, and nan-bread.

Halloween

I guess you can call this post long over-due, but I have had my boyfriend over from Norway this week so I didn’t really want to spend my time blogging. But here goes the story of my first Halloween in USA.

My first Halloween in the US is over, and what a day it was! I was looking forward to this day for a long time and I was really enjoying planning out my costume and what treats to make. All the food blogs I follow have been filled with Halloween-inspired recipes, mostly involving pumpkin and candy corn. It was really hard to decide on what to make, but I think what I settled on turned out pretty good. Despite the rain in New York on Halloween night, we had a really fun celebration. We had good food, good drinks and good friends…everything you need for a memorable night. It was so much fun just walking around our neighbourhood, seeing all the little kids dressed up to go trick or treating.

Here we are all dressed up and ready to go out. We each represent one drink you would often find in a liquor cabinet. From top left: Myself as Jameson Irish Whisky, Grey Goose Vodka, Johnnie Walker, Southern Comfort, Sake, and Jose Cuervo. I don’t really like whisky, but it was fun to dress up like a leprechaun and walk around with a pot of gold!

Halloween was a good excuse for me to really go all out in the kitchen, as I knew I would have a lot of friends to share everything with. I settled on making caramel apples, sugar cookies and of course a batch of cupcakes. For the cupcakes I used this recipe with the chocolate frosting and half a batch of the vanilla frosting from this post. Since I have tried that recipe before I knew the cupcakes would turn out great, but I wanted to do something more fun so I decided to try and make a two-tone frosting. I filled one side of the pastry bag with chocolate and the other side with vanilla. This being my first try I was pretty happy with the result, but I know it will look better after a few more tries.

I have never made caramel apples before so I decided to “cheat” a little. Instead of spending money on a candy thermometer and going to the trouble of making my own caramel, I bought a couple of bags of Werther’s Original Chewy Caramel and melted them in a pan with a little heavy cream. This really worked wonderfully and the apples were so good! I really like how shiny and nice they turned out, this is definitely something I will make again.

Caramel Apple Recipe

6 apples of your choice (I used McIntosh)

3 150 g (5.5 oz) bags of chewy caramels

3 tbsp heavy cream

Directions:

  1. Remove the stem from the apples and press a craft stick or chop stick into the top, about half way into the apples.
  2. Find a tray that will fit all the apples and line it with wax paper or parchment paper sprayed with oil.
  3. Heat the caramels slowly in a pan over low heat. As the caramels start to melt, add the cream.
  4. Continue to stir until the caramels are melted and allow to cool briefly.
  5. Roll each apple in the caramel and place on the tray. Put in the fridge immediately so the caramel sets.

Source: Cooking Dunkin style

The sugar cookies were my biggest project for this Halloween. I have never tried sugar cookies, let alone made them. Many blogs, including some of my favourites have featured these types of cookies, all decorated beautifully. Since this was my first attempt I didn’t expect them to be perfect, but I was really surprised by how well they turned out. I’m actually pretty pleased with the result. I think I will try to make these cookies again before Christmas, using different shapes and colours. For Halloween, I settled on ghosts, pumpkins, and spider web cookies. Decorating with royal icing was so much fun, but it does require a lot of time and patience.

Sugar Cookie Recipe

1 cup (2 sticks/ 230 g) butter, softened at room temperature

1 cup (225 g) sugar

1 egg

1 ½ tsp vanilla extract (or 3 tsp vanilla sugar)

3 cups (375 g) all purpose flour

1 ½ tsp baking powder

½ tsp salt

Directions:

  1. Cream the butter and sugar until light and fluffy.
  2. Add in the egg and the vanilla extract, and beat to incorporate.
  3. In a separate bowl sift together the flour, baking powder, and salt (and vanilla sugar, if using).
  4. Slowly add the flour to the butter mixture and beat until combined.
  5. Divide the dough into 2-4 portions (depending on the size of your baking sheet), and roll to just under 1 cm (3/8 inch) thickness.
  6. Chill in the fridge for 2 hours. Before you remove the dough from the fridge, preheat the oven to 180°C (350°F).
  7. Remove dough from fridge and cut your desired shapes. Remove the scraps and place sheet back in the fridge for 10-15 minutes. Repeat steps 5 through 7 with the scraps.
  8. Bake in the oven for 8-12 minutes depending on the thickness of your cookies (mine were a little thin, so 8 minutes was enough).
  9. Cool completely on a wire rack before icing.

Source: Adapted from The Hungry Housewife

Royal Icing Recipe

4 cups (500 g) powdered sugar

2 tbsp meringue powder

5 tbsp water

Directions:

  1. Combine all ingredients in the bowl of a stand mixer fitted with the paddle attachment, or a hand mixer. Mix on low speed until the sheen has disappeared and the icing has a matte appearance (about 7-10 minutes).
  2. Transfer the contents of the mixing bowl to an air-tight container. This will be the stiffest consistency of the icing, and at this point it is still too stiff to use for decorating. Add water a very small amount at a time and stir by hand until fully incorporated. Continue until the icing has reached a consistency appropriate for piping. Portion out the icing in different containers and add the colourings you are using.
  3. Using a pastry bag, pipe around the edges of each cookie. Let stand so the icing will set. Make sure to keep the leftover icing covered at all times when not in use so that it does not begin to harden.
  4. Once all the cookies have been edged, transfer some of the remaining icing to a separate air-tight container. Thin out by incorporating a small amount of water at a time, until the icing drips off the spoon easily when lifted and then smoothes in with that still in the bowl. If you go too far and the icing is too thin, add more sifted powdered sugar to thicken it again.
  5. Once the icing has reached the desired consistency, transfer it to a squeeze bottle (or a plastic bag with a hole in one corner), and flood the area surrounded by the piping on each cookie. If it does not completely spread to the edges, use a toothpick to help it along.
  6. Allow the cookies to dry and set overnight before putting them in containers.

Source: Annie’s Eats

For the ghosts I edged the cookies with white icing and used the thick black icing to pipe the eyes and the mouth. I then flooded the ghosts with thin white icing. For the pumpkins I used the thick black icing to make the “stems”, and edged the pumpkin with the thick white and then flooded with the thin white. I then immediately sprinkled on a thick layer of orange sprinkles. For the spider web cookies, I did the edges in thick black, and then flooded with thin black. I then used the thin white and piped three concentric circles over the black. Using a tooth pick, I made a line going from the centre of the cookie and out to the edge. Be sure to wipe off the tooth pick between each line you make.

Before you make sugar cookies I would recommend checking out these posts by Annie, Leslie, and Bridget

Good luck with these cookies, and thanks for stopping by!

Daring Bakers Challenge Macaroons

The 2009 October Daring Bakers’ challenge was brought to us by Ami S. She chose macaroons from Claudia Fleming’s The Last Course: The Desserts of Gramercy Tavern as the challenge recipe.

So, what does this mean? It means I have joined the Daring Bakers. Once a month we get a challenge which is secret to the public, we all bake something using the recipe from the challenge and then publish our posts on the same day (today). Hence, you can now expect me to blog about something truly wonderful and slightly advanced once a month. I was glad that this was my first challenge, I have made macaroons twice before (once successfully and once not so successfully…ok it was actually a disaster). The type of macaroons I’m talking about is of course not the chewy coconut kind, but the French kind – the amazingly cute and tasty kind. I have been to Ladurée in London, a very small pastry shop with a good selection of macaroons. When I was in Paris for my birthday this year my boyfriend bought me a cake and macaroons from their big store on the Champs-Élysées. Their macaroons are world famous and I can definitely understand why, they look too good to eat and they have a great selection of flavours. If anyone is ever in Paris, Ladurée is THE place to go for a treat.

I can say without hesitation that my macaroons did not turn out like they should have. My oven is very unreliable and it is impossible to know what the temperature is, so I think that is where it went wrong. At least, that’s what I like to think, for all I know it might have been a mistake I made that caused these macaroons to turn out the way they did. First of all, they did not look like proper macaroons should. I didn’t manage to get the trademark “feet” on my macaroons, instead they looked like plain old flat cookies. Secondly, they did not feel like macaroons. They were really chewy (which I actually liked), but they should have had a slightly hard outer shell and be soft in the middle. BUT, they did taste like macaroons! Yay! I filled mine with a simple chocolate ganache which I made by heating one part heavy cream to a simmer, and then adding that to one part 70% chocolate to melt the chocolate. I let it cool until the consistency was thick enough to pipe a nice thick layer on the macaroons, and then sandwiched them together. I really enjoyed the taste of these macaroons and I brought them with me to the dinner party I mentioned in my previous post. The girls all seemed to enjoy my failed macaroons, I don’t think they cared too much that they weren’t exactly perfect!

I think macaroons are really fun to make, so I will probably try them again some time. Next time, I will use a different recipe that I have had success with in the past. I think this recipe was a little too complicated, but you can find it on the Daring Bakers website if you feel like trying. I will recommend that if you decide to make macaroons you should find some other recipe, take a look on other websites and choose one that you think would work best for you. Good Luck!

Raspberry Cheesecake Brownie

Have you ever been in a situation where you had to choose between a brownie and a cheesecake? I have, many times, and I always end up with the brownie. Well, now you don’t have to make that choice as I bring you the Cheesecake Brownie! Seriously, this must be one of the top ten creations ever invented (at least in the cake world). What’s not to like? Brownie – mmm, Cheesecake – mmm, Raspberry whipped cream – mmm… This cake even looks as good as it tastes, with one brown layer, one white, and one pink. As usual, this recipe is from the Hummingbird Bakery Cookbook. I’m getting worried that if I reproduce any more of their recipes they might sue me, so I have decided not to print the recipe this time. What you do is make your favourite brownie recipe and pour it into a 33 x 23 x 5-cm baking tray. Top that layer with your favourite cheesecake filling (American style, not fridge-set style, a half batch is probably enough), and bake in the oven at 170°C (325°F) for 30-40 minutes. The cheesecake should be light golden around the edges. Leave cake to cool completely, then refrigerate for at least two hours, preferably overnight. I over-baked the brownie a little so be sure you check the cake after 30 minutes.

I made this cake for a dinner party last week, but unfortunately the party was cancelled so Brittany and I were stuck with all this deliciousness all to ourselves. We gave some away, but we still had this for dessert basically every day for a week. The dinner party was actually back on this week so I made a new dessert, will post it in a couple of weeks. While we are on the subject of this dinner party I want to say thank you to all of Brittany’s amazing friends (you know who you are) who have welcomed me into their group. It has been so nice to get to know you all and I am looking forward to many more dinner parties and other events to come. It makes me really happy when you say that you enjoy my baking so you can expect more where that is coming from!

I will definitely make this cake again and again. It looks really fancy and the taste is unbeatable, but it is also simple to make.

What else is new? Well, I haven’t done much out of the ordinary lately. Studying, eating, sleeping, exercising, relaxing, drinking etc. We are getting ready for Halloween now and I am so exited for my first Halloween over here. I think we have decided on a pretty fantastic theme for our costumes; we’re going as different drinks you would find in a liquor cabinet! I will try to post some pictures some time in the near future. Until then, enjoy the fall colours and make yourself a treat! Thanks for stopping by my blog today.

To make the raspberry frosting you need:

300 ml whipping cream

100 g icing sugar

150 g raspberries

Put all the ingredients in a bowl and whisk with an electric mixer until firm but not stiff.

Spread over the cake and decorate with extra raspberries. Enjoy!